A guest post by Nic Morales
Day 1- Atlanta to Rockmart
With a frigid start not necessarily encouraging movement, I took the opportunity to meet with local cycling persona and filmmaker Hannah Griggs (QueerCyclist) at a favorite coffee shop of mine. A friend recommended Chrome Yellow some years ago, and I've always made a point to stop in whenever in town. What better place to meet someone that inspires me? We had a lovely conversation about cycling, Atlanta, and their goals within it.

The first challenge was getting from central Atlanta to the Silver Comet Trail– a bike-specific super-highway that starts in Smyrna, Georgia, and ends in Anniston, Alabama. Though Atlanta's cycling infrastructure is largely similar to that of other metropoli in this country– robust in high-income sections, virtually non-existent in portions of lesser economic means– the route I took happened to pass through one of my favorite suburbs. Buckhead's rising roads and ripping descents are second to none and are really only spoiled by how close Range Rovers tend to fly by. Maybe it's just because I'm a Floridian, but the extreme and sudden change in elevation is always fascinating. A few ripping descents and less than stellar 'bicycle-friendly' roads later, and I was on the Silver Comet connector.
An extremely welcome sight for sore eyes, the Silver Comet was a much better experience than I'd ever expected. Having been introduced to the trail a little over a year ago via an 'Ed Cycles The World' video– a youtube series made by a young British kid who unicycled(!!!) around the globe– I hadn't ridden it last time I visited. At the very same Chrome yellow, another cyclist, one lycra-clad with an SL7 in tow, said the comet was boring and recommended another route. Though the recommendation was pretty spectacular, it was road heavy. However, I'm thankful I had lowered expectations for The Comet because it's everything a bike-specific trail should be. It wasn't just an afterthought someone made paralleling a highway. It's a beautiful, expansive throughline that takes advantage of the brilliance of bikes. Rolling through nature, unrelenting scenic views, and places forgotten by modern society.


With my eventual end drawing ever closer, I tried to push less pleasant thoughts about the numerous freeze warnings the county had issued. I happened to be traveling amid a near historic 'polar vortex' of sorts. Deciding to pull the trigger on the trip was a mix of not wanting to wait for a rainy April to get any closer and the acceptance that life waits for no one. Quickly closing in on my destination, I searched for a 'stealthy' spot to set up my bivvy.
I tried to position myself as close to the border as possible to get a good start on the proceeding day, shivering as I set up camp. Before sunset, a truck rolled by and politely inquired about my presence. With honesty as my guiding policy, even in situations where you're in the wrong, I told of my travels and plans. They happened to be the owners of a local BnB– one that often took to cyclists, given their proximity to the trail. With a cold sweat creeping up my heavily layered back, I took the opportunity to stay indoors that evening without much hesitation. Better safe than sorry, I figured.
As it happened, other cyclists were staying that night. A group of middle-aged folks on their first ever 'bike vacation,' using 'ancient Schwinns' to traverse the trail. We talked about cycling, the South, their kids, and what I did for work over a conversation spanning generations, perspectives, and ideologies. Despite our differences, we shared a respect and kindness through shared experience. Wanting to get a relatively early start, I shuffled off to bed long before they did, but not before sharing a meal—one they bought me, despite only knowing the extent of my travels. Southern hospitality delivered me to a warm bed and dinner on night one.
Day 2- Rockmart to Oxford
The coldest day was in front of me, and despite a warm, lovingly made breakfast, my lack of gear-related preparedness started to set in. I had enough layers and such, but I'd hesitated to camp because my sleep system was rated closer to the 40s and 50s than it was for the 20s and 30s. Though I own a 0-degree sleeping bag, the amount of space it takes up is simply impractical for a mile-heavy trip. Moreover, February in Florida had been unseasonably warm, so I assumed that the 500 or so miles north would provide a perfectly mild temperature to bikepack through. Men make plans, and God laughs, though, as a concerned employee of the Christian coffee shop I meandered outside of informed me March would be historically cold. C'est la vie.
At the Alabama/ Georgia border, I had a decision to take the remote forest service roads south until I either camped or hit some form of civilization or continue on the trail and loop said roads back in when I was headed back north. Given I had no opportunity to meaningfully resupply prior to the fork, I decided on the latter.


After the border, the trail morphs seamlessly into the Chief Ladiga trail. Passing through farmland and open field, the terrain was a bit tame. Fears about whether I was doing 'enough' on the trip began to creep in as I approached the town of Weaver. Stopping in a local coffee shop to escape the unrelenting cold, a kindly older gentleman remarked on the brutal temperatures through an interaction that evoked the old west. He asked about my travels and where I was headed. After telling of my end goal of Anniston / Oxford, he quickly frowned and said that he'd lived near there for some years and that 'folk down there just ain't right.' While I wasn't quite sure what he meant, I experienced something of a vibe shift upon entering the small town of Anniston.
Triple wide 'sroads' with no shoulder, and cars, or more aptly, massive trucks, flying by. I did my best to navigate through backroads until I found some reasonable infrastructure, but it was few and far between. After a close call with a Lincoln, I decided to take a second and gather myself. Alone, without much guidance, I thought, 'If this is the rest of the trip, I'm not sure I'm going to make it.' To exacerbate matters, the night's temperatures were set to be even lower than the night prior.
All that said, I'm usually not one to freak out. I can make decisions in pressure situations and be secure in how I move about the world when the time calls for it. If there's anything the bicycle has taught me, it's that there's little use in worrying or over-complicating. Make the best decision and do so with confidence. After booking a room at a local motel, I called it for the day. I felt tired, a bit defeated, and somewhat fraudulent. I'd lugged around all this gear I hadn't been using. I was barrelled off the road by cars, there was no trail left to speak for, and I was primarily fueled by things that can't be called food. This was my first solo bikepacking trip and one that differed pretty significantly from Florida's flat, temperate landscape. It represented a low point set by false expectations. I had to be kinder to myself– if anything, to ensure I made it out of the Red Roof Inn in Oxford, Alabama.
Day 3 Part 1- Oxford to FSR 500
Determined to have a better day than the last, I set out for both the first dirt and peaks of the trip. Cheaha Mountain, the highest point in Alabama, was a mere 16 miles away– how hard could that possibly be? With a stomach full of Waffle House, I set out on back country roads that were slightly less disconcerting given the time of day. Eventually, pavement turned to dirt, and the car-driven anxiety faded. Despite the cold, the dirt climbs put a massive smile on my face. Using the full range of my cassette felt incredible as I chugged my way up gorgeous, crisp mountain switchbacks. Things were starting to turn around.

After some wayfinding, I got back on the pavement. This time, on a road that was respectful of other living things. Though I'm usually one to try and sprint up a climb, I knew I had a long day ahead. Happy to sit back and crank away; the climb just kept coming. Despite the thinning air and biting cold, every moment of that morning was incredible. Watching the canopy recede as I drew closer to the summit, I felt galvanized knowing I was starting to accomplish what I came here for.
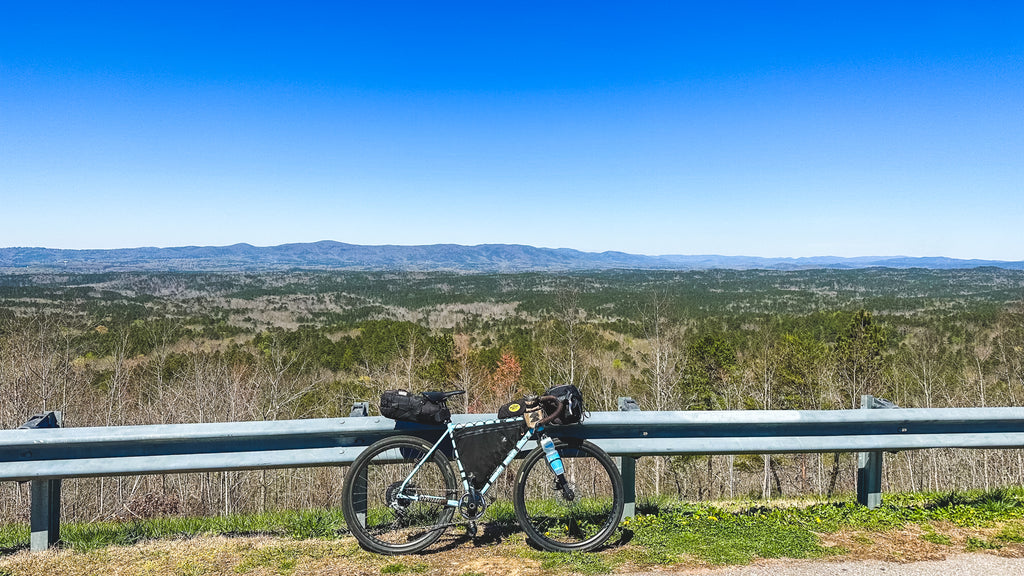
Arriving at the pseudo-summit, I purchased an entry pass to the peak and a few other snacks. The attendant and I spoke about how the spot was a local haunt for cyclists. After a moon pie and some Body Armor, she allowed me to shirk my bags at the store and ascend the peak with roughly fifteen fewer pounds. I took to the paved loop and hit the peak in no time. The summit was a classic southern view, and something I felt summed up my feelings about the area. Those who grow up in the South and appreciate the outdoors often compare ascents like Cheaha to those farther west. While they don't necessarily maintain the same immediate photogenic quality, something intangible fills my soul when I see a classic southern peak. The rolling hills are packed with trees. There's something hidden. There's something old. There's something beautiful. Take your sheer rock faces– you can have them. The mind explodes with wonder and possibility in the endless sea of orange, brown, and green. Much like the South itself, it hides a beauty that requires a more discerning eye to recognize.

I was grateful for the change in tides as I re-strapped my bike's front and rear bags, taking to the descents with a big, dumb smile. One that only got bigger as I flew down my hard-earned peak faster than most would be willing to in a car. A few of my best Tom Piddcock impressions later, and I was back to relatively flat land. I stopped at a gas station and scarfed down a slice of pizza as I gazed at the upcoming elevation. One step at a time, I assured myself.
Atop Horseblock mountain, I met the first and only group of 'cyclists' I'd encounter on the trip. I asked them for some advice about which roads to steer clear of and then took to the descent, thinking I'd be alone again. To my surprise, they chugged along beside me for some time. We spoke about cycling in the area, the beauty of the terrain, and the club they were a part of. The split in the day came after some of the best road riding I'd ever done. The Talladega scenic drive is truly one of the best roads I've ever experienced. I don't think I saw a car for about an hour, the views are incredible, and the riding is rewarding.
During the earlier conversation, their 'leader' informed me that the next big resupply was in Heflin and that I'd best stay on the scenic drive for as long as I could and power through a stretch of highway 78 if I was intent on staying near the town for the night. Eventually, I came to the split– a section where the scenic drive meets Forest Service road 500. Once more, I had a decision to make– play it safe and head for the town of Heflin or take the gravel path that passed through some four peaks on its way back to the border town of Piedmont. Having already done 40-odd miles with a hefty amount of elevation for a Floridian, there was definitely a physical motivation to take the safe route to Heflin. Moreover, the Garmin inReach mini I'd acquired at the behest of my very concerned mother fell off at Cheaha, so I'd be without emergency tracking for the most remote and ostensibly dangerous section. But, a little voice in my head edged me toward the gravel path. Again, I felt the trip hadn't panned out how I'd planned it. I'd come all this way for a journey of self-discovery and motivation– had I accomplished that yet? Had I done much at all?
In retrospect, it's a stupid question. Embarking on a 300+ mile solo bikepacking trip encompassing more climbing than these flatland legs have ever taken on was task enough, let alone during an unseasonably cold section at the foothills of Appalachia. But, like I am known to do, I often say the most fun you can have is putting yourself in a situation and figuring it out. It is the premiere form of self-actualization, and I'd venture to say it would help anyone's struggles with mental health, as it shows you what you're capable of, what you're not, and how much you can blur those lines.
So, not knowing what the path had in store for me, I took to it, secure in my ability to handle the challenge before me.
Keep your eyes peeled for Part 2!


.jpg)
.jpg)